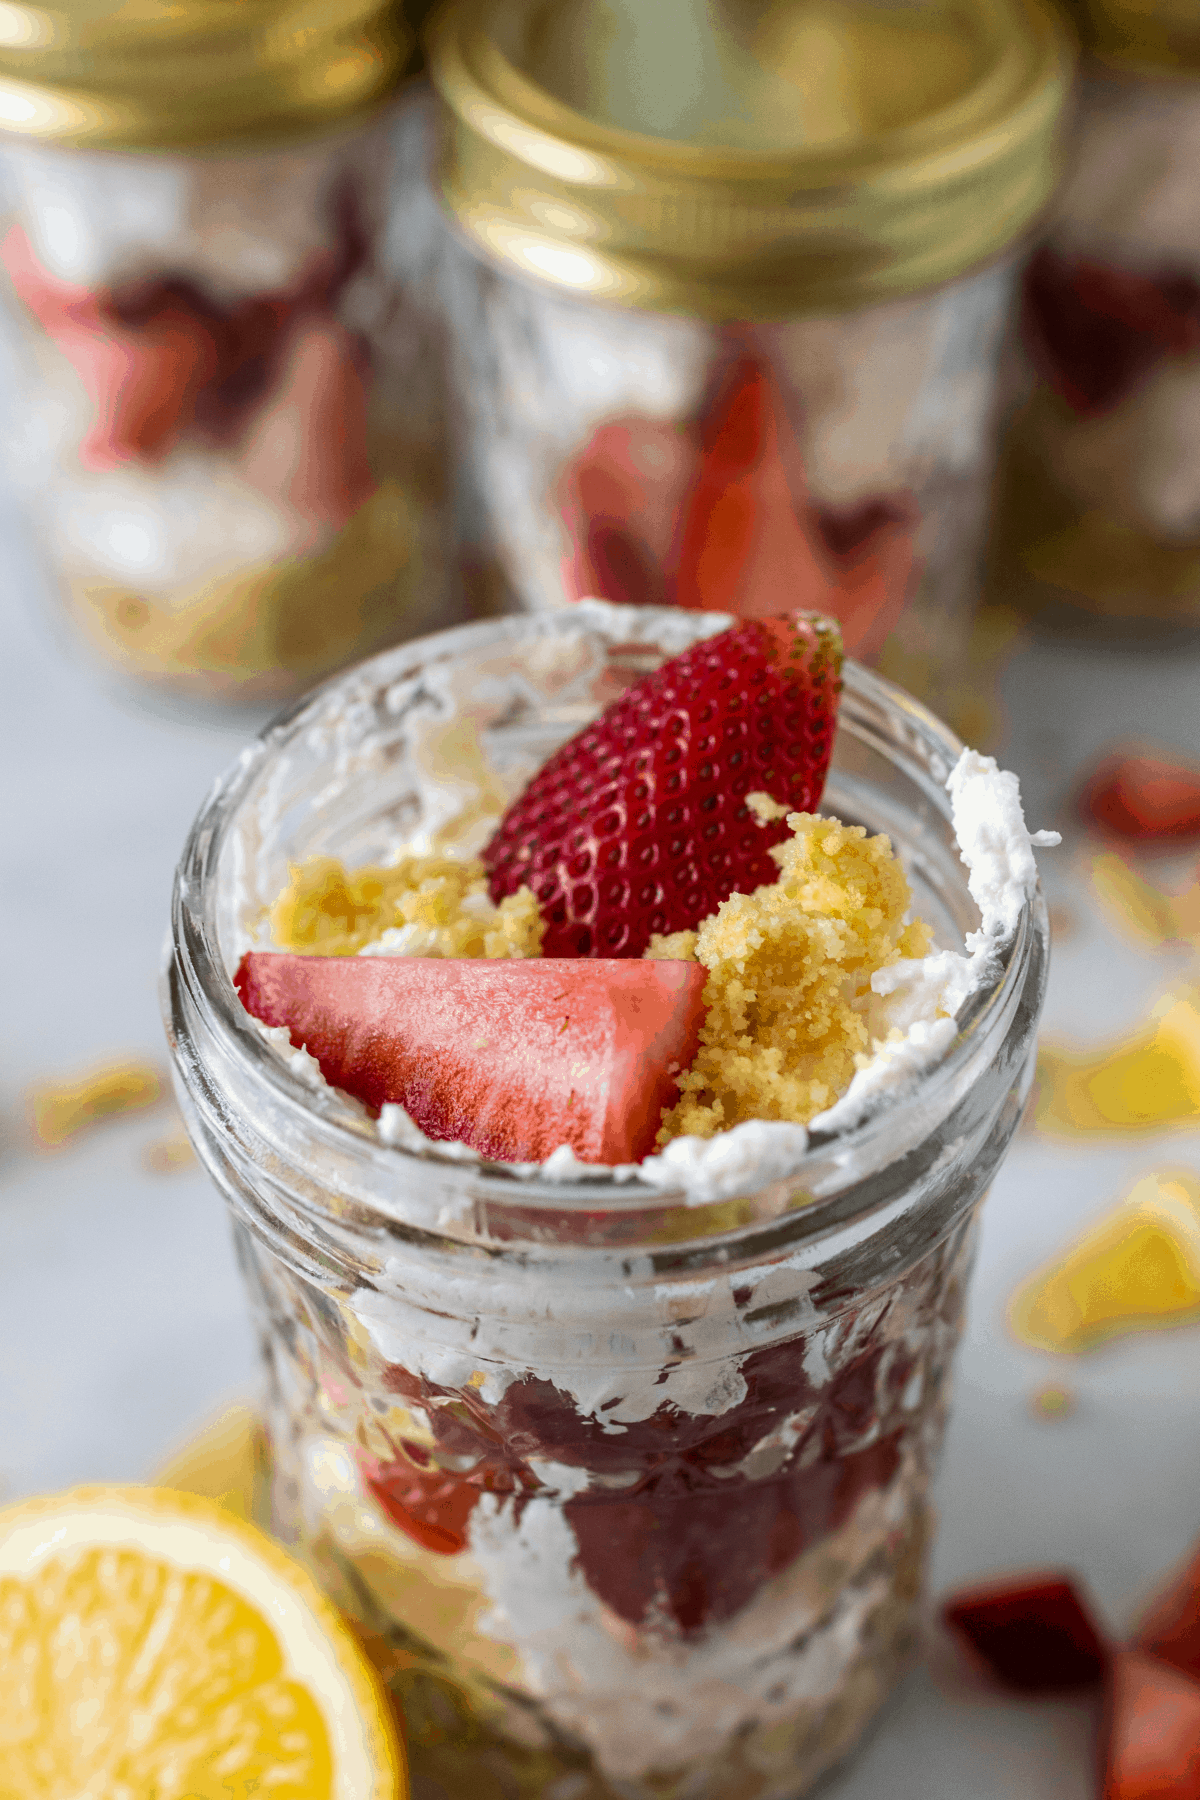
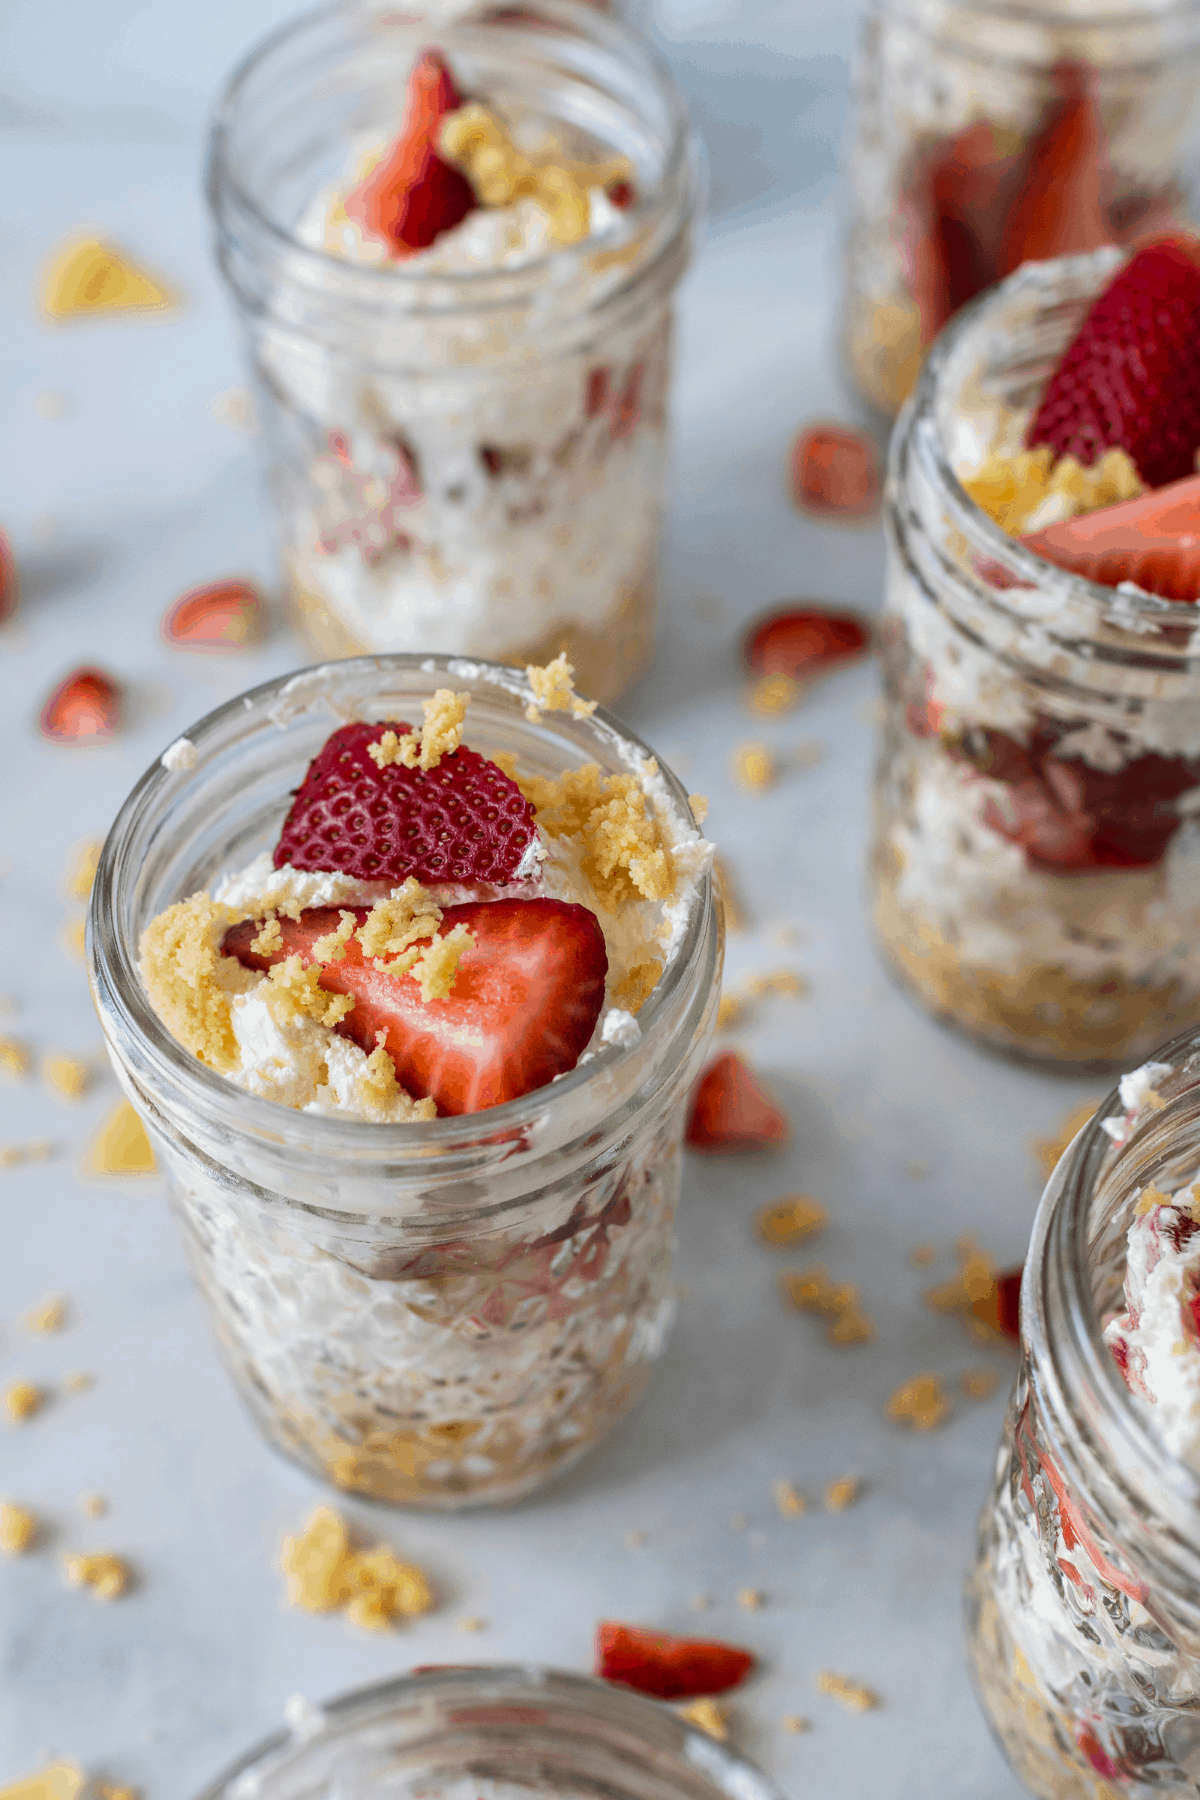
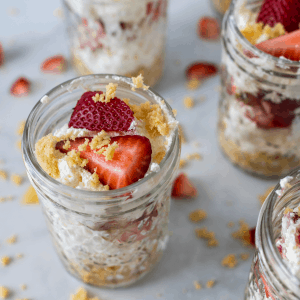
These No-bake Strawberry Cheesecake Jars are the perfect summer dessert recipe. Each jar includes individuals layers of lightened up no-bake cheesecake, organic vanilla wafer crumbs, lemon, and strawberries. This sweet treat is perfect for enjoying during the spring and summer months!

I don’t share many desserts. Mainly because if I made a bunch of desserts, well, I’d eat them, and that probably wouldn’t end well for my blog.
However, I genuinely believe dessert can and should be a part of a healthy diet. It all comes down to planning, portion control, and using quality ingredients. Of course, a dessert is still a dessert so enjoy it in moderation.
This brings me to these no-bake Strawberry Cheesecake Jars. Sure, I could’ve made one big cheesecake, but then I’d grab a piece and convince myself that it wasn’t too big of a portion.
Layering all of the ingredients into a mason jar allows me to enjoy dessert while knowing precisely the amount I’m eating.
These strawberry cheesecake jars are scrumptious. They have all the flavors of a cheesecake layered into a perfect portion-controlled jar.
Of course, If you’re looking for a recipe to satisfy a chocolate craving, then check out my no-bake chocolate peanut butter cheesecake jars—the same concept but for all of my chocolate peanut butter lovers out in the world.
And, bringing this no-bake cheesecake dessert to a party is always a hit – people love eating out of mason jars.
All the reasons you’ll love this recipe
- No-bake! Keep the house cool while whipping together this healthy dessert recipe, perfect for summer.
- High-quality ingredients. I searched organic and high-quality ingredients that don’t include high-fructose corn syrup, additives, or preservatives.
- Portion-control. Each mason jar is a serving!
- Make-ahead. Whether you want a sweet treat during the week or to bring a dessert for a weekend party, you can prepare these no-bake strawberry cheesecake jars ahead of time.
Ingredients
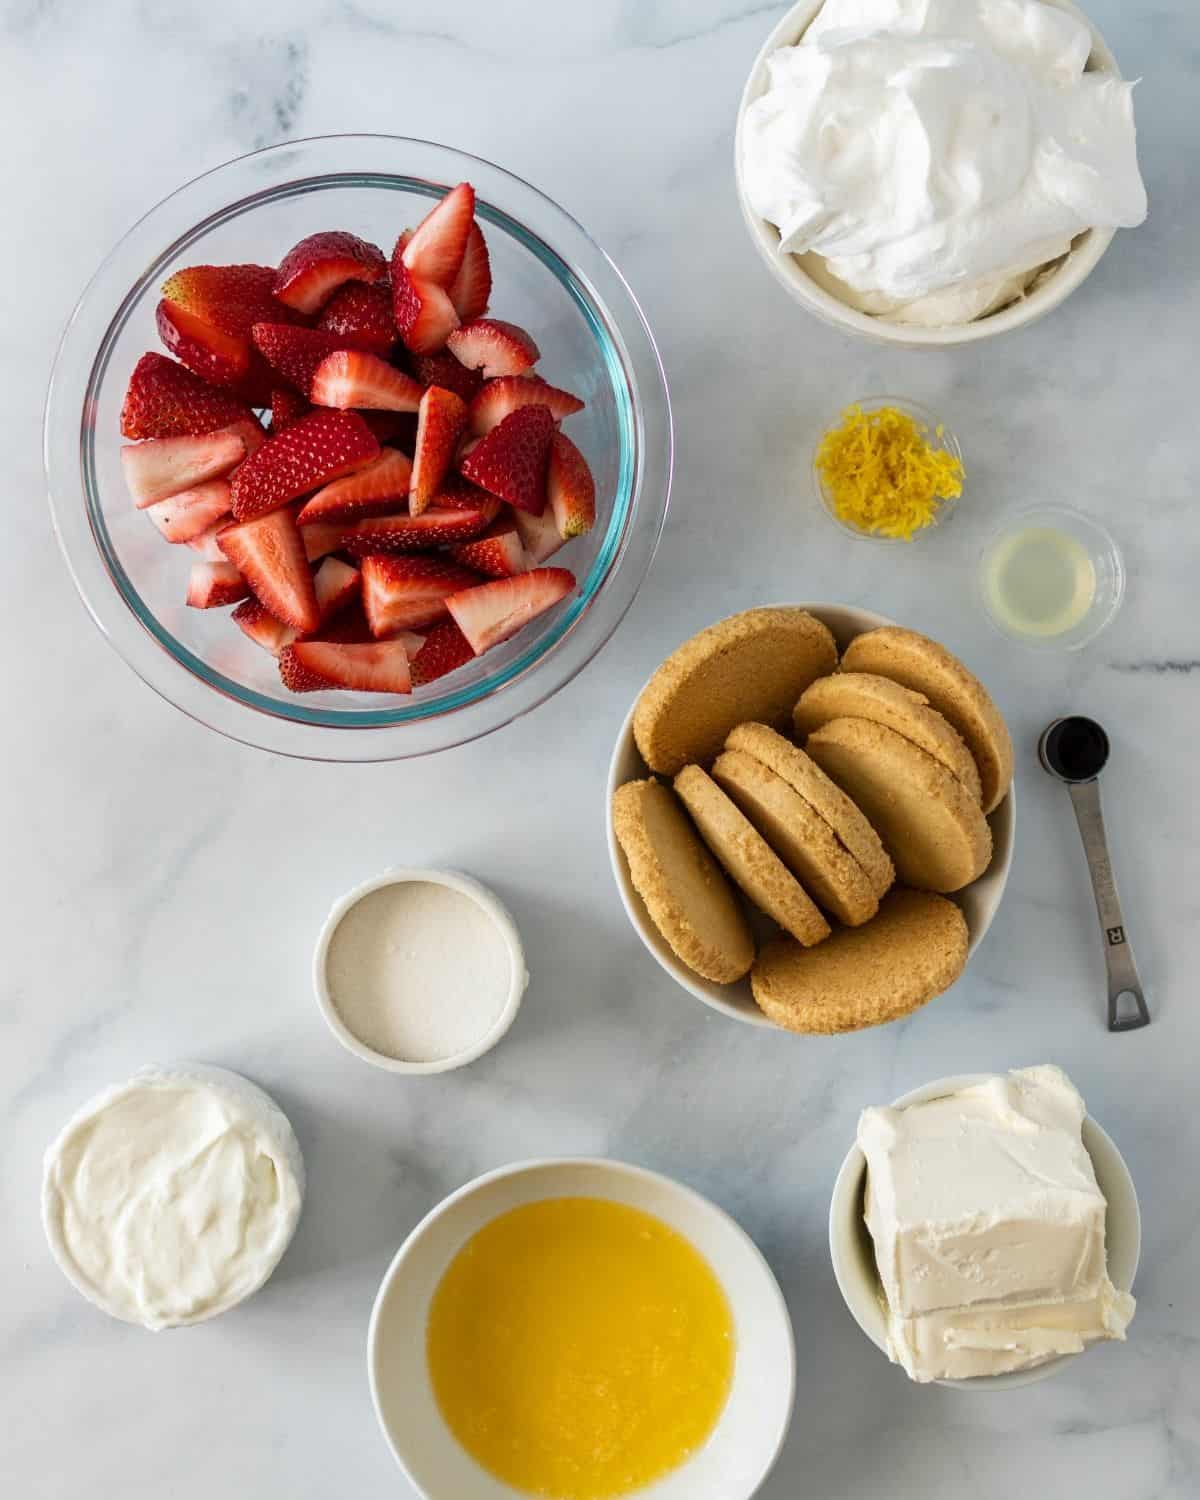
- Reduced-fat cream cheese – Also called Neufchâtel, this cream cheese is lower in fat and calories while still flavorful and creamy.
- Greek yogurt – this adds protein to the dessert without extra fat. The Greek yogurt also makes the cheesecake filling creamy and tasty.
- Granulated sugar – I used ¼ cup sugar in this recipe. It’s the smallest amount, without losing the sweet flavor you expect from a dessert recipe.
- Vanilla extract – this adds another layer of flavor to the no-bake cheesecake filling.
- Strawberries – fresh juicy organic strawberries are the best choice for this recipe. I recommend looking for a dark red strawberry.
- Lemon – this adds a burst of fresh lemon flavor that compliments the strawberries perfectly.
- Truwhip – This is the natural healthy cousin to Cool Whip. There’s no high-fructose corn syrup, and it’s just as delicious. You can find this in the frozen section of the store’s organic area, or it could be located right alongside the Cool Whip.
- Vanilla wafer cookers – I found an 8-ounce package of organic vanilla wafers in the grocery store’s organic section. My advice is to look for a brand and read the label to make sure the crackers don’t include any artificial ingredients or preservatives.
- Butter – Use unsalted organic butter for the healthiest results.
Supplies
- Food processor
- Hand mixer
- Mason jars and lids
FAQS
A baked cheesecake includes eggs and bakes in the oven. After it’s done baking, then it needs to cool in the refrigerator for a few hours.
A no-bake cheesecake doesn’t need to go into the oven and will set or “stiffen up” after sitting in the refrigerator for 1-2 hours or overnight. I like to make no-bake cheesecakes the day before and let them sit overnight in the fridge for best results.
There might be a couple of reasons this is happening. First, there might be too much extra liquid from the strawberries or greek yogurt. So, after washing the strawberries, make sure to pat them dry thoroughly. If the greek yogurt has a lot of liquid, use a mesh strainer to drain any excess liquid.
Second, it might need longer to set in the refrigerator. Typically, it can be ready to eat within a couple of hours, but it may need longer. If you find that it’s still running or soft, then put it back in the refrigerator. This is why it’s helpful make this at least a day ahead of time, if you can.
This recipe works best with fresh strawberries. Unfortunately, frozen strawberries might release too much liquid causing the filling to become running.
However, you could leave the strawberries out of the filling and just cook down the frozen strawberries into a syrup to use on top.
This mixed berry sauce would work with frozen strawberries to create a strawberry sauce that will taste delicious drizzled on top of the cheesecake.
Cooking Tips
Make this no-bake strawberry cheesecake in a pie dish or pan. I’ve only made this dessert using individual mason jars. However, I’m confident it would work as one whole cheesecake.
To make into a whole cheesecake. Press the vanilla cookie crumbs into the bottom of a pie plate and then fill with the no-bake cheesecake filling. Put it into the fridge and let it sit overnight. Add extra strawberries, lemon zest, and crumb topping to the top and serve. That’s the way I would make it.
8-ounce mason jars work perfectly for this recipe. However, you can layer this in any size glass jar you want. Just keep in mind that if you make a bigger portion, that’ll add more calories.
Make sure the Greek yogurt and whipped topping are cold. This tip is essential to the thickening and setting process. If those ingredients are at room temperature or warm, then the result could be a runny cheesecake. So, keep those ingredients in the fridge until you’re ready to use them.
Drain the Greek yogurt, if needed. Extra liquid from Greek yogurt could make for a runny no-bake cheesecake recipe. So, if you notice any excess liquid, then drain the greek yogurt using a mesh strainer.
You can use a stand mixer to mix the cheesecake filling. I prefer to use my hand mixer because it’s easier for me; however, if you choose to use a stand mixer, that will work.
You can also make a graham cracker crust. This recipe will be delicious with both a vanilla cookie wafer crust and a graham cracker crust. Simply process the graham cracker in the same way or purchase graham crackers crumbs – you’ll need about 1 ½ – 2 cups of crumbs.
Make it gluten-free. Substitute the vanilla wafer for a gluten-free alternative if you need a crust free of gluten.
Freeze leftover crumb mixture. If you do have any leftover it can be used with future desserts.
How to Make No-bake Strawberry Cheesecake Jars
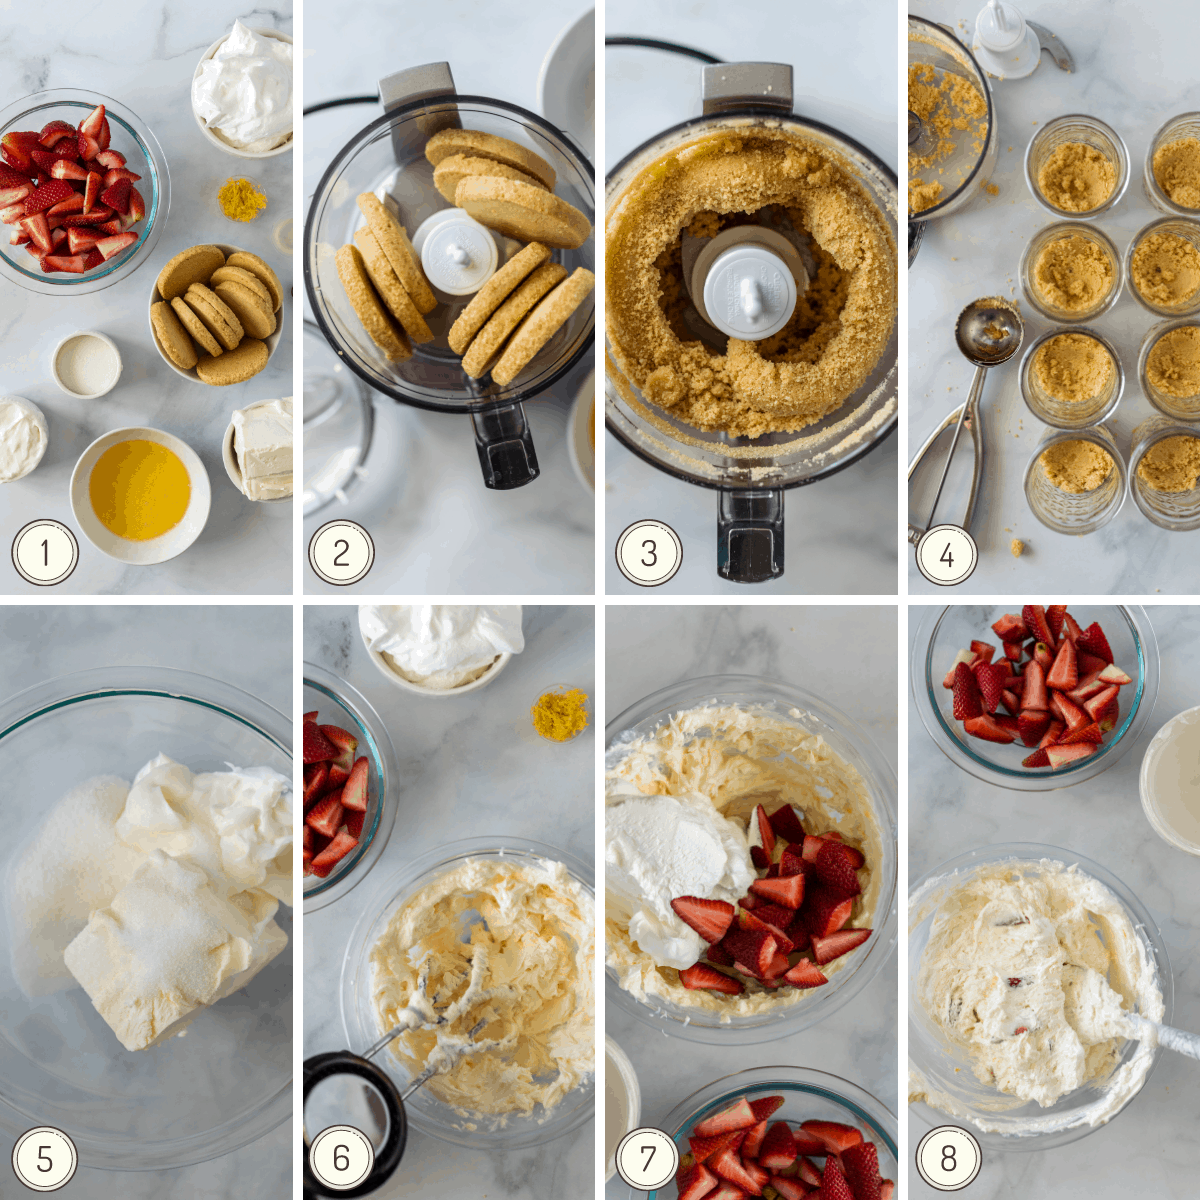
Start by making the crumb mixture. Place the vanilla wafers into a food processor and process the cookies until they become fine crumbs. Pour in the melted butter and process the crumbs for about 3-5 seconds. The crumb mixture will start to look a little clumpy.
Measure out about two tablespoons of crumb mixture into the bottom of each mason jar. You can use a spoon to press down the vanilla wafer crumb mixture slightly; it doesn’t need to be packed.
Put the jars into the refrigerator to firm up while you make the cheesecake mixture.
Place the softened cream cheese, greek yogurt, and sugar into a large mixing bowl.
Using a hand mixer beat the ingredients on high speed until smooth and creamy. Add in the vanilla extract, lemon zest, and lemon juice. Blend for another 30 seconds or until all the ingredients are blended.
Gently fold in the whipped topping and 1 cup of the chopped strawberries into the cream cheese mixture.
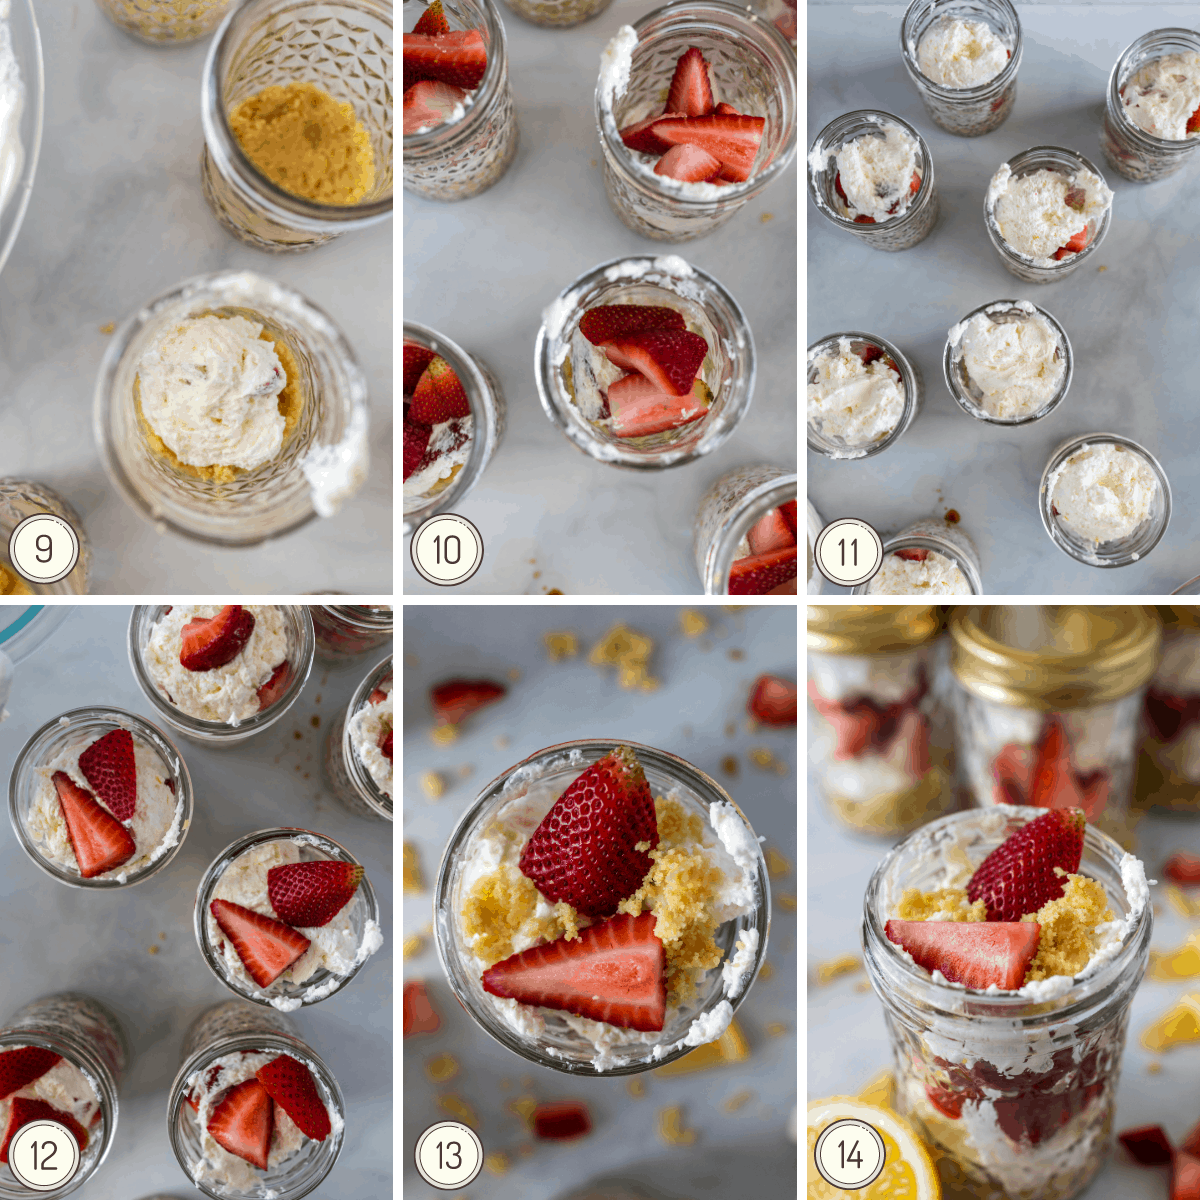
Take the jars out of the refrigerator. Spoon about 2 – 3 tablespoons of the cream cheese mixture into each of the jars.
Next, layer about 2- 3 tablespoons of the strawberries between the jars.
Divide the rest of the cream cheese among the jars – this equals about one tablespoon in each jar. Divide the rest of the strawberries among the jars.
Place lids tightly on the jars and refrigerate for 1-2 hours or overnight. Serve cold.
How to store this recipe
You can store the no-bake strawberry cheesecake jars in the refrigerator for up to 5 days.
No-Bake Strawberry Cheesecake Jars
Equipment
- Food Processor
- Hand Mixer
- Mixing Bowls
- 8-ounce mason jars and lids
Ingredients
- 8 ounce package high-quality vanilla wafers
- 3 tablespoons unsalted butter melted
- 8 (8-ounce) mason jars
- 8 ounces reduced-fat cream cheese softened
- ½ cup plain greek yogurt this is equal to a 5.3 ounce container.
- ¼ cup granulated sugar
- 1/2 teaspoon vanilla
- zest of 1 lemon
- 1 teaspoon lemon juice
- 1 ½ cups high-quality whipped topping I use Truwhip
- 4 cups hulled and quartered strawberries divided
Instructions
- Place the vanilla wafers into a food processor and process cookies until they become fine crumbs.
- Pour the melted butter into the crumbs and process for about 3-5 seconds, until the crumb mixture starts to stick together and look clumpy.
- Measure out about 2 tablespoons of crumb mixture into the bottom of each mason jar. Using a spoon press down the crumb mixture, slightly. It is okay if it is not packed down.
- Place the jars into the refrigerator to firm up while you make the cheesecake filling.
- To make the cheesecake filling place the cream cheese, Greek yogurt, and sugar in a large mixing bowl. Then use a hand mixer and beat the ingredients on high speed until smooth and creamy. Add in the vanilla extract, lemon zest, and lemon juice. Beat for another 30 seconds or until all the ingredients are blended.
- Gently fold in the whipped topping and 1 cup of the strawberries into the cream cheese mixture.
- Take the jars out of the refrigerator. Spoon about 2 – 3 tablespoons of the cheesecake filling into each of the jars. Next, layer about 2- 3 tablespoons of the strawberries between the jars. Divide the rest of the cheesecake filling among the jars. Divide the rest of the strawberries among the jars.
- Place lids onto the jars and refrigerate for 1-2 hours or overnight. Serve cold.
Notes
Nutrition
Other Healthy Strawberry Recipes
- Strawberry Chocolate Chip Muffins
- Strawberry Lemon Yogurt Jars
- Strawberry Banana Overnight Oats
- Strawberry Banana Yogurt Smoothie
- Strawberry Mango Smoothie
Not sure what to make? No problem, you can freeze strawberries in a recipe later on.
Have you tried this No-bake Strawberry Cheesecake recipe? If so, I’d love for you to rate this recipe and leave a comment below. We all learn from each other’s experiences. Also, it would be awesome if you could share a picture on Instagram and tag it #organizeyourselfskinny. I can’t wait to see it!
Aimee says
I’m in Australia and don’t know what truwhip is. Can I substitute whipped cream?
Carmen says
Yes! it’s the same as whip cream!
Jen D says
I’m making these now for the second time! Delicious! I try most of your recipes- you never see to disappoint 🙂